Best Price Guaranteed
Price: $1.44
Item #S-5-VERSACLIP
Write a review!
Quantity:

Overview

Available

for purchase separately, VersaClip™ makes installation easy, as it

simply slides on the ColorGard® crossmember. It can be used with all

S-5!™ clamps (one per clamp), and is optional with

CorruBracket™. VersaClip™ is not needed with VersaBracket™. VersaClip™

is also handy when installing ColorGard® askew, such as is required in

the valleys between intersecting rooflines.

More Info

The sudden and unexpected release of snow

from the roof can be dramatic, posing a serious threat to property and

passers-by. ColorGard dramatically reduces the risks associated with

rooftop avalanches and maintains the clean colorful appearance of the

roof with perfect color and finish matching, which lasts as long as the

roof itself! ColorGard is the only snow retention system designed and

engineered on a site-specific basis; guaranteed to perform, to not

damage the roof or finish, and to exactly match the roof color—for the entire life of the roof.


Today’s premium Kynar 500 and Hylar 5000 (PVDF) paint systems used on

metal panels are “coil-coated” and oven-cured. This is the only finish

application method that can be warranted against color fade for 30

years or longer. Nothing can equal it! So, why settle for less in a

snow guard system? While some dyes, powder-coats and air-dried color

application methods may initially simulate a perfect match, the color

soon begins to fade and becomes increasingly mismatched with a few

years of age. By utilizing a strip of the actual roof material,

ColorGard perfectly matches the roof—forever!


ColorGard is mechanically attached with patented S-5!™ clamps. S-5!™

is the trusted name in metal rooftop attachment technology worldwide.

S-5!™ patented, round-point setscrews grip the seam securely without

penetration and without damage to the panel’s protective finishes. The

clamps are precision-machined from aircraft quality, high tensile

aluminum—not cast or plastic. All related hardware is non-ferrous

stainless steel for lasting performance.


To help you design a ColorGard system for your purposes, we invite you to use the ColorGard Calculator.


ColorGard does not rely upon adhesives for attachment to the roof panel.


Why does that matter?


The premium finishes used on today’s metal roof products are

fluorocarbons— “Hylar” and “Kynar” by tradename. These paint resins

(polyvinylidene difluoride or PVDF) are similar in chemical composition

to “Teflon,” the popular non-stick coating for pots and pans. Indeed,

the benefits of this type of paint are related to its non-stick

characteristics. Gluing a device to a non-stick surface results in a

rather unreliable performance and a high rate of failure. In addition,

most adhesives are temperature-cure compounds, which means that they

can only be applied in warm weather and require weeks to cure, limiting

their installation seasonally.


To help you design a ColorGard system for your purposes, we invite you to use the ColorGard Calculator.


Can ColorGard be Retrofitted to An Existing Roof?

Yes, ColorGard can be easily retrofitted to existing roofs, or incorporated into new

construction design. ColorGard can be installed any time of year.


Is Design Assistance Available For ColorGard?

Yes! It is critical to design a solution that takes into account the effects of gravity on a snow-covered roof. The tested holding strength of ColorGard must be checked and proven against the actual “in-service” gravity loads of the roof. This

important step in application engineering should not be omitted for any snow retention product.


To help you design a ColorGard system for your purposes, we invite you to use the ColorGard Calculator. The calculator will help you to “tailor” the ColorGard system on a project-specific basis, allowing for all the variables involved—and even provide a printout of the calculations and a material requirement list.


How Easy is it to Install?

Once designed, ColorGard is easy to install and requires only tools that are common to the trade.


Because S-5!™ ColorGard uses mechanical attachment rather than adhesives, installation can be done any time of year, with no cleaning, no priming, no cure times, and no callbacks!


What About Cost?

ColorGard is the best buy on the market! This is the best news of all! ColorGard has greater holding strength, better aesthetics, longer service life, and lower installed cost than any other engineered system on the market. Pound-for-pound of holding strength, ColorGard is a better buy than individual cleats or glued units.

Installation

String a line at clamp location.To help you design a ColorGard system for your purposes, we invite you to use the ColorGard Calculator.

You may also want to download and print complete documentation on installing the ColorGard® system, by clicking here.

ColorGard® is easy to install.

First, at the desired location, use a string line across the top of the panel seams - this will establish a true line for installation of the S-5!™ clamps. Individually measuring each clamp location from the eave is not recommended.

When installing clamps on roof panels which utilize a two-piece panel attachment clip, the clamp may be installed at a clip location if desired. When the panel system utilizes a one-piece clip, installing at clip locations should be avoided.

If the ColorGard® assembly utilizes the VersaClip™ for attachment of the ColorGard® crossmember, the bolt hole in the clamp should be at the upslope end of the clamp.
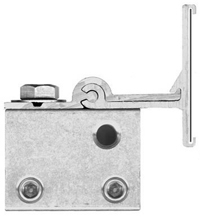
VersaClip™ assembly with bolt hole on the upslope end of the clamp.

If the assembly does not use VersaClip™, the hole should be at the downslope end of the clamp. Determine which side of the clamp to load the setscrews into, and assemble all setscrews to all clamps, being careful that the bolt hole will be in the correct (upslope or downslope) orientation, with the setscrews on the correct side of the seam.
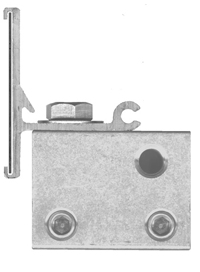
S-5!™ clamp without the VersaClip™ with the bolt hole shown on the downslope end of the clamp.

S-5™ clamps are available to fit almost any seam. Refer to the Clamp section of this Web site to view installation instructions.

Position the clamps appropriately on the panel seam, using the string line as a guide.
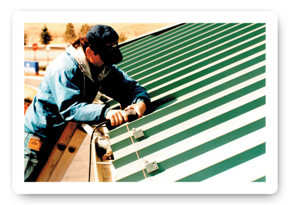
Using the Allen-wrench attachment tip for 1/4" screwgun (included in the box), tighten and retighten setscrews as the seam material compresses. On low seam profiles, clamp spacing should never exceed 32".
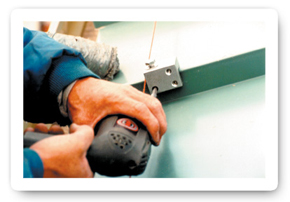
An Allen-wrench attachment tip is included in your purchase.

We recommend using the Angle Driver (available at your S-5!™ distributor) to facilitate easy installation and avoid damage to the panel.
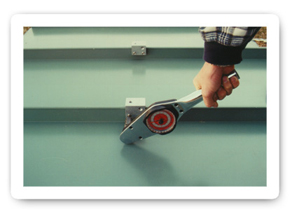

Angle drivers are available through for purchase

NOTE:

Do not be concerned if after installation the clamp appears slightly "cocked" on the panel seam. It will straighten out when ColorGard® is installed.

The holding strength of S-5!™ clamps is highly dependent upon setscrew tension. Consult the S-5!™ Load Tables by clicking here

For maximum holding strength, setscrews should be tensioned and re-tensioned as the seam material compresses. Clamp setscrew tension should be verified using a calibrated torque wrench between 160 and 180 inch pounds when used on a 22-gauge steel, and between 130 and 150 inch pounds for all other metals and thinner gauges of steel. Published data regarding holding strength is available for viewing here.

CAUTION:

Battery operated guns may not deliver consistent screw tension.

Drywall guns may not deliver adequate tension.
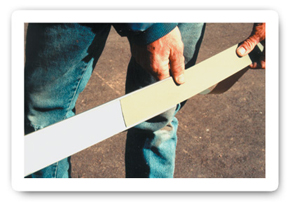
Slide color strip into the ColorGard® crossmember.Color strips should be sheared from the same prefinished metal as the roof panels. Shear strips to exactly 2" wide (8' or 10' long). Slide the color strip into the ColorGard® crossmember as shown. If the strip length is 8 feet, it may be pre-assembled into the ColorGard® crossmember. If the strip is 10 feet long it will be assembled into the ColorGard® as installation progresses.
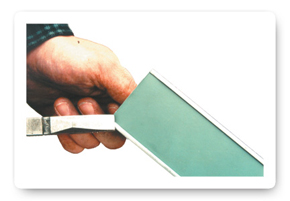
Anchor color strip to the ColorGard® by pinching the retainer lip with pliers.Joints in the ColorGard® can be concealed, if desired by offsetting the joints of the color strip from the joints of the ColorGard®. When this is done, the joints of the color strips should be overlapped about 1/2 inch.

Each color strip should be anchored to the ColorGard® somewhere along its length. This is done by pinching the retainer lip of the ColorGard® with an ordinary pair of pliers. It can be done at one end of the ColorGard® section as shown, or anywhere along its length. Attach ColorGard® to clamps with stainless bolts and washers provided. Bolts can be tightened with a 9/16" box-end wrench, or ratchet (lower left). On larger jobs a 1/2" drive electric impact will expedite this work. Tension bolts to 20 ft. lbs. (27 N.m.)
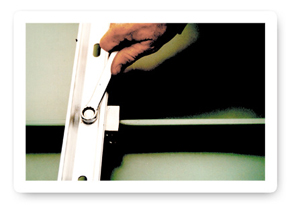
After attaching ColorGard® to a clamp, tighten the clamp bolts with a 9/15" box-end wrench or ratchet to 20 ft. lbs.Attach ColorGard® to clamps with stainless bolts and washers provided. Bolts can be tightened with a 9/16" box-end wrench, or ratchet (lower left). On larger jobs a 1/2" drive electric impact will expedite this work. Tension bolts to 20 ft. lbs. (27 N.m.)

Add splice pieces at each ColorGard® joint as shown. The "dimple" in the splice piece will automatically provide a 1/8" space between adjoining sections to allow for linear thermal expansion of the ColorGard®.

Cost

ColorGard® is beautiful, functional, durable, economical and easy to install.S-5!™ ColorGard® is the best buy on

the market! Better holding strength, better color retention,

user-friendly installation—this all equates to higher cost, right?

Wrong.


Everyone wants better quality—as long as it also costs less. Well, with

S-5!™ ColorGard® you can have your cake and eat it, too! When compared

with other fence type systems on a cost per foot basis, ColorGard®

wins, hands down—even though it is several times stronger than most of

those systems. When compared to individual cleat type units,

pound-for-pound of holding strength, ColorGard® costs much less—yes,

even less than the plastic parts. It even costs less to install!

Roofing contractors find the ColorGard® system so easy to work with

that they charge less to install it than they do for installing any

other competitive product on the market today! (And to make things even easier for you and your distributor, we now offer an online ColorGard® calculator to help you design your snow retention system.)


Placing Cost in Context


Snow accumulations on sloped metal roofs can pose significant danger to property and life. These accumulations can succumb to gravity and avalanche in a catastrophic manner–harming landscape, gutters, adjacent roofs, vehicles or even passersby. A properly designed, quality snow retention system can mitigate the danger and nuisance of sliding snow. However, it is important to realize that not all snow retention products are created equal. When selecting and specifying a product or system, it is critical to accurately compute the roof’s design service snow load, and to choose a system that will provide the protection needed to withstand that calculated load. The good news is that there are tools out there to perform the system design and make comparison shopping much easier–often with surprising results regarding cost!


Plastic snow guards are sometimes chosen because they are assumed to be the lowest cost solution. In reality, they are often the highest, actually costing several times more than a system that lasts longer, installs quicker, looks better, prevents damage to the roof and eliminates messy glue residues. Because today’s premium metal roof finishes are similar in chemical composition to “Teflon,” chemical bonds like tapes, glues and adhesives provide only temporary and unreliable solutions with a service life of just a few years. The low holding strength of the adhesive also diminishes over the short service life of the bond. In the best case the strength of a stick-on part is only equal to the peeling strength of the paint to which it is stuck.


Case Study

LEFT: Plastic snow guards at $26.63 per linear foot. RIGHT: S-5!™ ColorGard® at $8.51 per linear foot.

A gabled roof project with a run of 60 feet, slope of 2/12, design roof snow load of 30 psf, and 160 feet of total protected eaves. Utilizing the calculations recommended by one manufacturer of adhered plastic snow guards, the job requires 960 plastic snow guards, 138 tubes of adhesive and three boxes of panel wipes for a total material cost of over $4,200; not to mention extensive labor costs.


By comparison, the same roof, when calculated using the S-5!™ online calculator, results with one row of ColorGard® system consisting of 242 components, designed and lab tested for the specific roof profile and costing only $1,361 (suggested MSRP). The ColorGard® looks beautiful, matches the roof color perfectly, protects the panel manufacturers’ warranty, installs much more quickly–any time of the year, lasts as long as the roof itself, and actually costs much less! With ColorGard® you really can buy the best for less!

Video

Reviews (0) • Write a review!

This product has no reviews yet. Write a review!

Related Items
S-5 ColorGard Un-Punched, 7' 8" Piece w/Splice
Use Unpunched when the roof has untrue seam width or seam width is not divisible by 4.
Price: $26.89
Availability: In Stock
Usually ships within 1-2 Business Days

>Unpunched ColorGard is the most versatile and easy to install, when used with the S-5! VersaClip. Unpunched does not need holes, as the VersaClip accommodates any seam spacing. The unpunched configuration works well with VersaBracket.  Unpunched is the right choice when the roof is laid out with untrue seam width or when the seam width is not divisible by 4. If in doubt, use unpunched. Included with crossmembers, use the Splice to join two pieces of ColorGard together, ensuring...

S-5 ColorGard Punched, 7' 8" Piece w/Splice
Punched ColorGard is slotted every 4” on center for seams that are spaced accordingly
Price: $29.16
Availability: In Stock
Usually ships within 1-2 Business Days

Punched ColorGard® is slotted every 4” (10.2 cm) on center for seams that are spaced accordingly, i.e. divisible by 4” (10.2cm). The slotted configuration works well with S-5!™ clamps.  

Leave a message